Looking to build a new website with a subscription feature for your products? Look no further, we have the ultimate guide to building a subscription website using the Shopify platform!
Step 1: Gathering Requirements
As you look to build out your new subscription service, box or product, it’s important to consider how you want the subscription service to work and how you’ll profit from it. To do this, we’ve compiled a list of requirements to help anyone who is setting out for the first time narrow in on the right structure for their subscription process.
- What is the subscription for – a product, a service, a box, a membership or something else?
- How often will the subscription renew?
- For example, every 30 days? Every month? Every quarter?
- Will you also allow customers to pick from different frequencies on the product page?
- Does the subscription renew every 30 days, or will it be on a fixed day of the month?
- If you have a fixed day of the month, consider closely how you’ll handle shipping out orders.
- Will you allow users to pause or skip a renewal?
- Allowing users to pause or skip a month is a great way to cut down on churn.
- Can users order additional one-time purchase items in conjunction with their subscription?
- Can users upgrade or change their subscription after they purchase?
- For example, if you offer different flavors of a product, can a user choose between them each month?
- How will you handle failed subscriptions or expiring cards ?
- Will you send a follow-up email, contact them directly, or send them a promotion to re-enter a valid card?
- Do you have a minimum cancellation term?
- For example, subscriptions must be canceled 2 days before shipment?
- Will you offer free shipping or a discount for subscription orders?
Once you have a full list of requirements, you can begin to think about what content you’ll need for the site to sell your subscription.
Step 2: Calculating Profit & Churn
Now that you have figured out how you want your subscription program to work, it’s important to review how to make your subscriptions profitable. Let’s use a simple example such as doing a subscription for a bag of coffee.
In this example you know from experience that for every $10 you spend in advertising you can get 1 order on your website. Most orders are for $36 because you offer free shipping at $25 or more. A bag of coffee costs you $6 to make and sells for $12 on the site. That means you are not left with much in terms of profit, especially after you cover the cost of shipping the item. However, if you start selling your product as a subscription, that $10 you spend on marketing will pay off even more as long as a customer stays subscribed, this is where understanding churn comes in.
Churn is equal to the number of subscribers who canceled / total number of subscribers. An ideal churn is between 2-8% on a monthly basis but you may want to prepare to have a higher amount of churn initially.
Once you’ve done your math around figuring out where you’ll be profitable, circle back around to how your subscription is set up and what the other fees are around offering a subscription. For instance, if the subscription only renews quarterly, will that be frequent enough for you to make a return on your advertising spend? Or if your subscription will allow you to make more with your advertising budget, can you afford to offer a 10% or 15% discount for subscription orders?
Step 3: Getting Set Up with ReCharge
Here at Cadence Labs we’ve found ReCharge to be the best subscription plugin for Shopify sites. It’s versatile and offers a robust system that is capable of managing any product type you are looking to sell as a subscription. Head on over to their website to sign up for an account and get their plugin installed on your Shopify site.
Once you have the plugin installed you can start setting up products, terms, follow-up emails and more in ReCharge. Take a look at ReCharge’s getting started guide to start getting your subscription program configured on their plugin. Make sure you hit these important steps as you complete your setup:
- Set up your payment processor.
- Customize and personalize your notification emails; it’s especially important to improve your cancellation and card decline emails as these will help reduce your churn.
- Create a test product and manually run through the subscription process yourself to ensure everything is correctly configured.
Step 4: FAQs and Customer Service
Before you launch your new subscription service it’s important to make sure you are prepared from a customer service angle. We have found that the best way to cut down on customer complaints and supports needs is to create a clear FAQ that explains how the subscription works and what happens in some different scenarios. Here’s a few key items to clarify in your subscription FAQ:
- Can I use discounts / coupon codes with my subscription?
- What happens if my first order is above the free shipping threshold but my subscription total is not?
- How can I cancel or pause my subscription?
- Can I change my shipment date?
- Can I rush my subscription or process it ahead of time?
- Can I change my subscription product or options once I’m subscribed?
Step 5: Adding Recharge to your Product Page
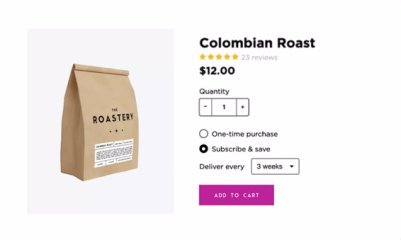
The final step for going live is to add the subscription option to your product page. ReCharge has a standard layout which you can use for you products. It looks like this:
However, we have found that it’s important to do a little more to customize the subscription area so a customer understands what the subscription entails. By providing additional information such as a Learn More link, you can help cut down on customer questions or complaints.
See our subscription demo here.
If you use Adobe XD you can download a copy of our free subscription product page mockup here.
Need help getting subscriptions set up for your site? Let us handle the process for you. From strategy to implementing a customized product page, our development team is here to help!


