
In this post we are going to be exploring Shopify Scripts — an advanced feature of Shopify that makes it possible to modify objects server side such as cart contents, shipping rates, and available payment methods. As our example, we will be implementing a wholesale pricing feature. For this feature, we will use customer tags. Once implemented, we will be able to tag a customer with a tag such as “WHOLESALE_10” or “WHOLESALE_30” and they will receive discounts of 10% or 30% respectively, across the store. This will be reflected in our cart thanks to our script, and we will update the Debut theme to show these prices in collections and elsewhere on the site. This could likely be implemented for other reasons as well, such as employee purchasing or industry discounts.
Limitations
If you followed that link above, you would have noticed a large warning that this is only available to plus merchants. There are a few other limitations worth considering as well, which Shopify does a good job of outlining here. In case you aren’t following the external links as we read along here, there’s a few pretty important ones in my mind (everyone’s business needs vary though, so I would strongly recommend reviewing them):
- You cannot access metafields (on anything)
- You can have only 1 of each type of script published (ie active) — there are 3 categories: line item, payment, and shipping (outlined here)
- Scripts require a shopping cart, and therefore will not work with Shopify’s Buy Button nor Facebook / wholesale sales channels
- You cannot access custom checkout / cart attributes
Also, not mentioned but you will likely find out after getting frustrated:
- You cannot increase a cart items price above it’s original price, only decrease it
- You cannot add or remove items from a cart
- You cannot remove discount codes from a cart, however you can prevent them from having any effect
- You cannot communicate with any outside services, or otherwise cause or pull in “side effects”
Finally, in general, what information you have access to about a given resource is far more limited than either liquid or via their AJAX API, so it is worth reviewing the API documentation.
Advantages
There a few advantages (some pertaining to our wholesale pricing example) that we gain:
- This all happens server side, so there is no way for a customer to refresh the page too soon or fiddle with your site to break this
- The discounts are tied to accounts, not codes so they cannot be shared widely
- As we don’t use discount codes, it is possible to also use discount codes alongside this discount (if desired)
- We don’t add any third party apps, maintaining site speed (in theory, you could slow down your store with a script so be smart!)
Getting started
As mentioned above, you will need to be doing this on a plus store. Once logged in, visit here to install the Shopify Script Editor app. After getting our script working, we will be editing the Debut theme as an example to show how to incorporate this pricing into your store outside of the cart. If you are on a different theme, this may not apply. If you’d like to test this out and follow along, I have created a Github repository here with a debut theme starter. There is a branch called completed that includes the finalized code for reference. We will also need some catalog items to test our script (if you are using a test store), I usually pull some from here.
Overall functionality
This example will function as follows:
- A customer must be logged in to receive this discount
- A customer must be manually tagged in admin with a tag that begins with “WHOLESALE_” and ends with a number to receive a discount
- This tag is read by our script, and the number at the end of the tag is the percentage off of each item in the cart
Setting up the script
With everything prior completed, you should be able to open the Script editor app and create your first script. If this is your first time opening the app, you will be greeted with a pop-up to create a script. If this pop-up didn’t show for you, just click “Create script” in the top right corner.
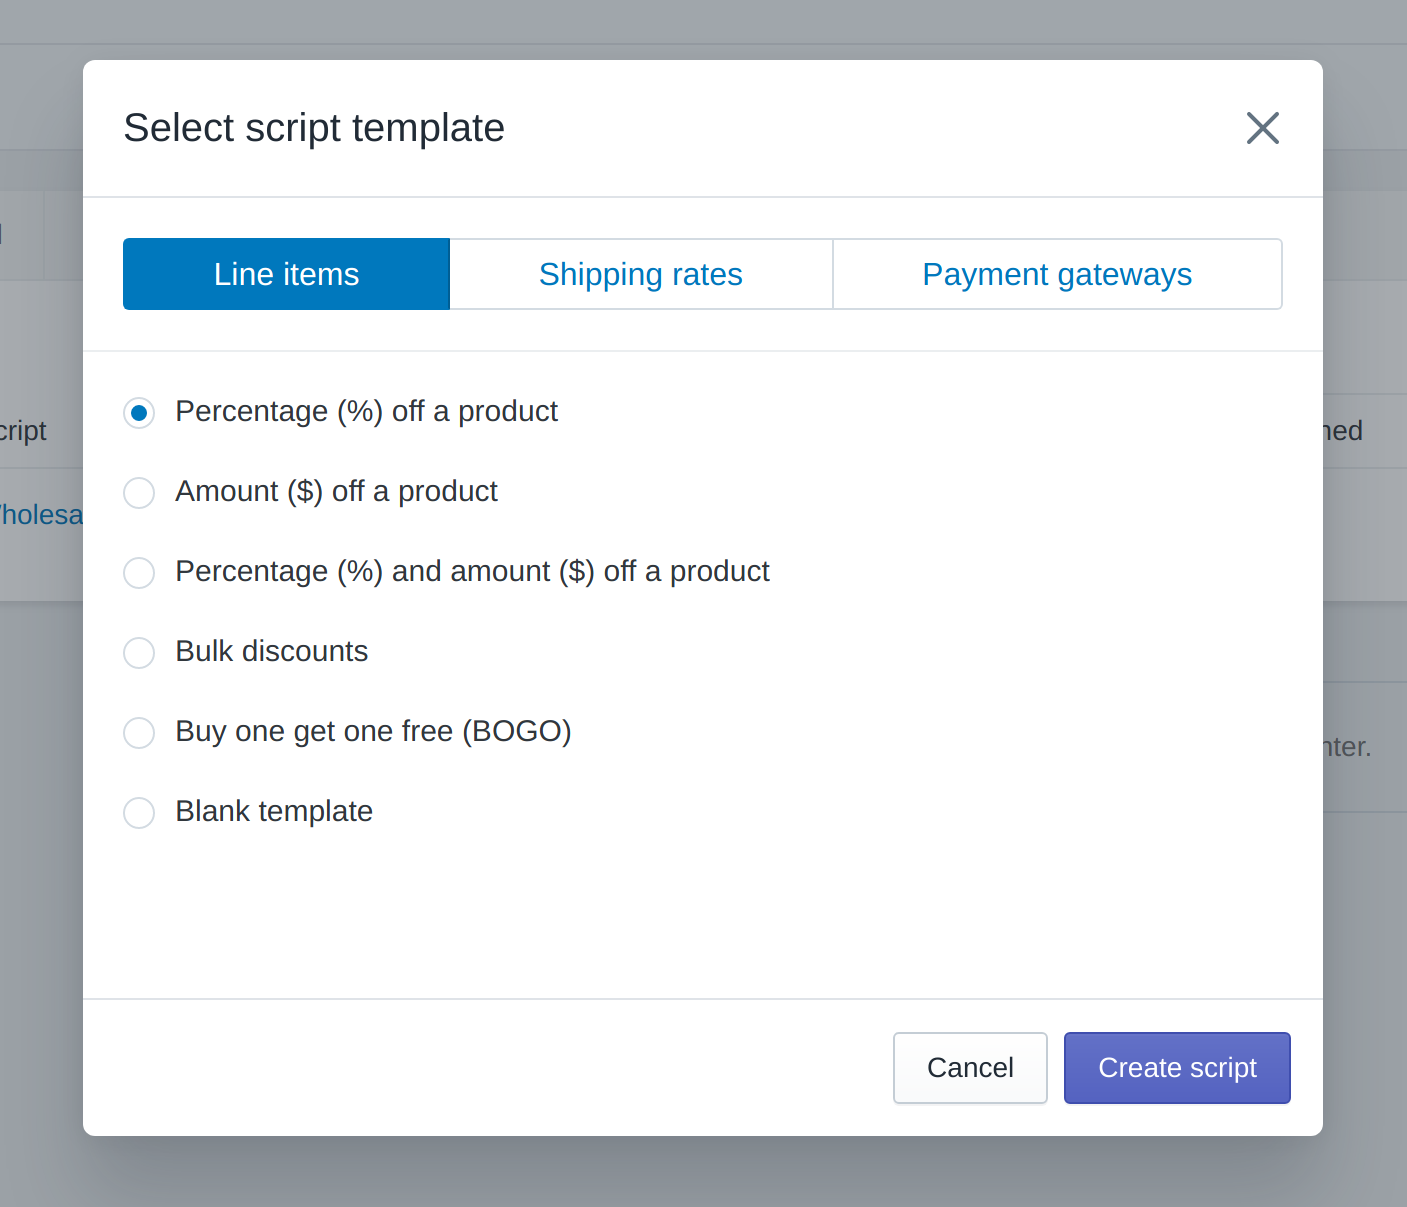
We will be making a Line Item script in this example. These scripts will run any time a change is made to the cart. I couldn’t find that Shopify clarifies this anywhere, but I would take this to mean whenever someone adds/removes items, changes cart information (such as emal or address), or applies or removes a discount code. Once past this pop up, you will be greeted with the script editor screen. If you chose a template, likely the name is different than what’s shown here:
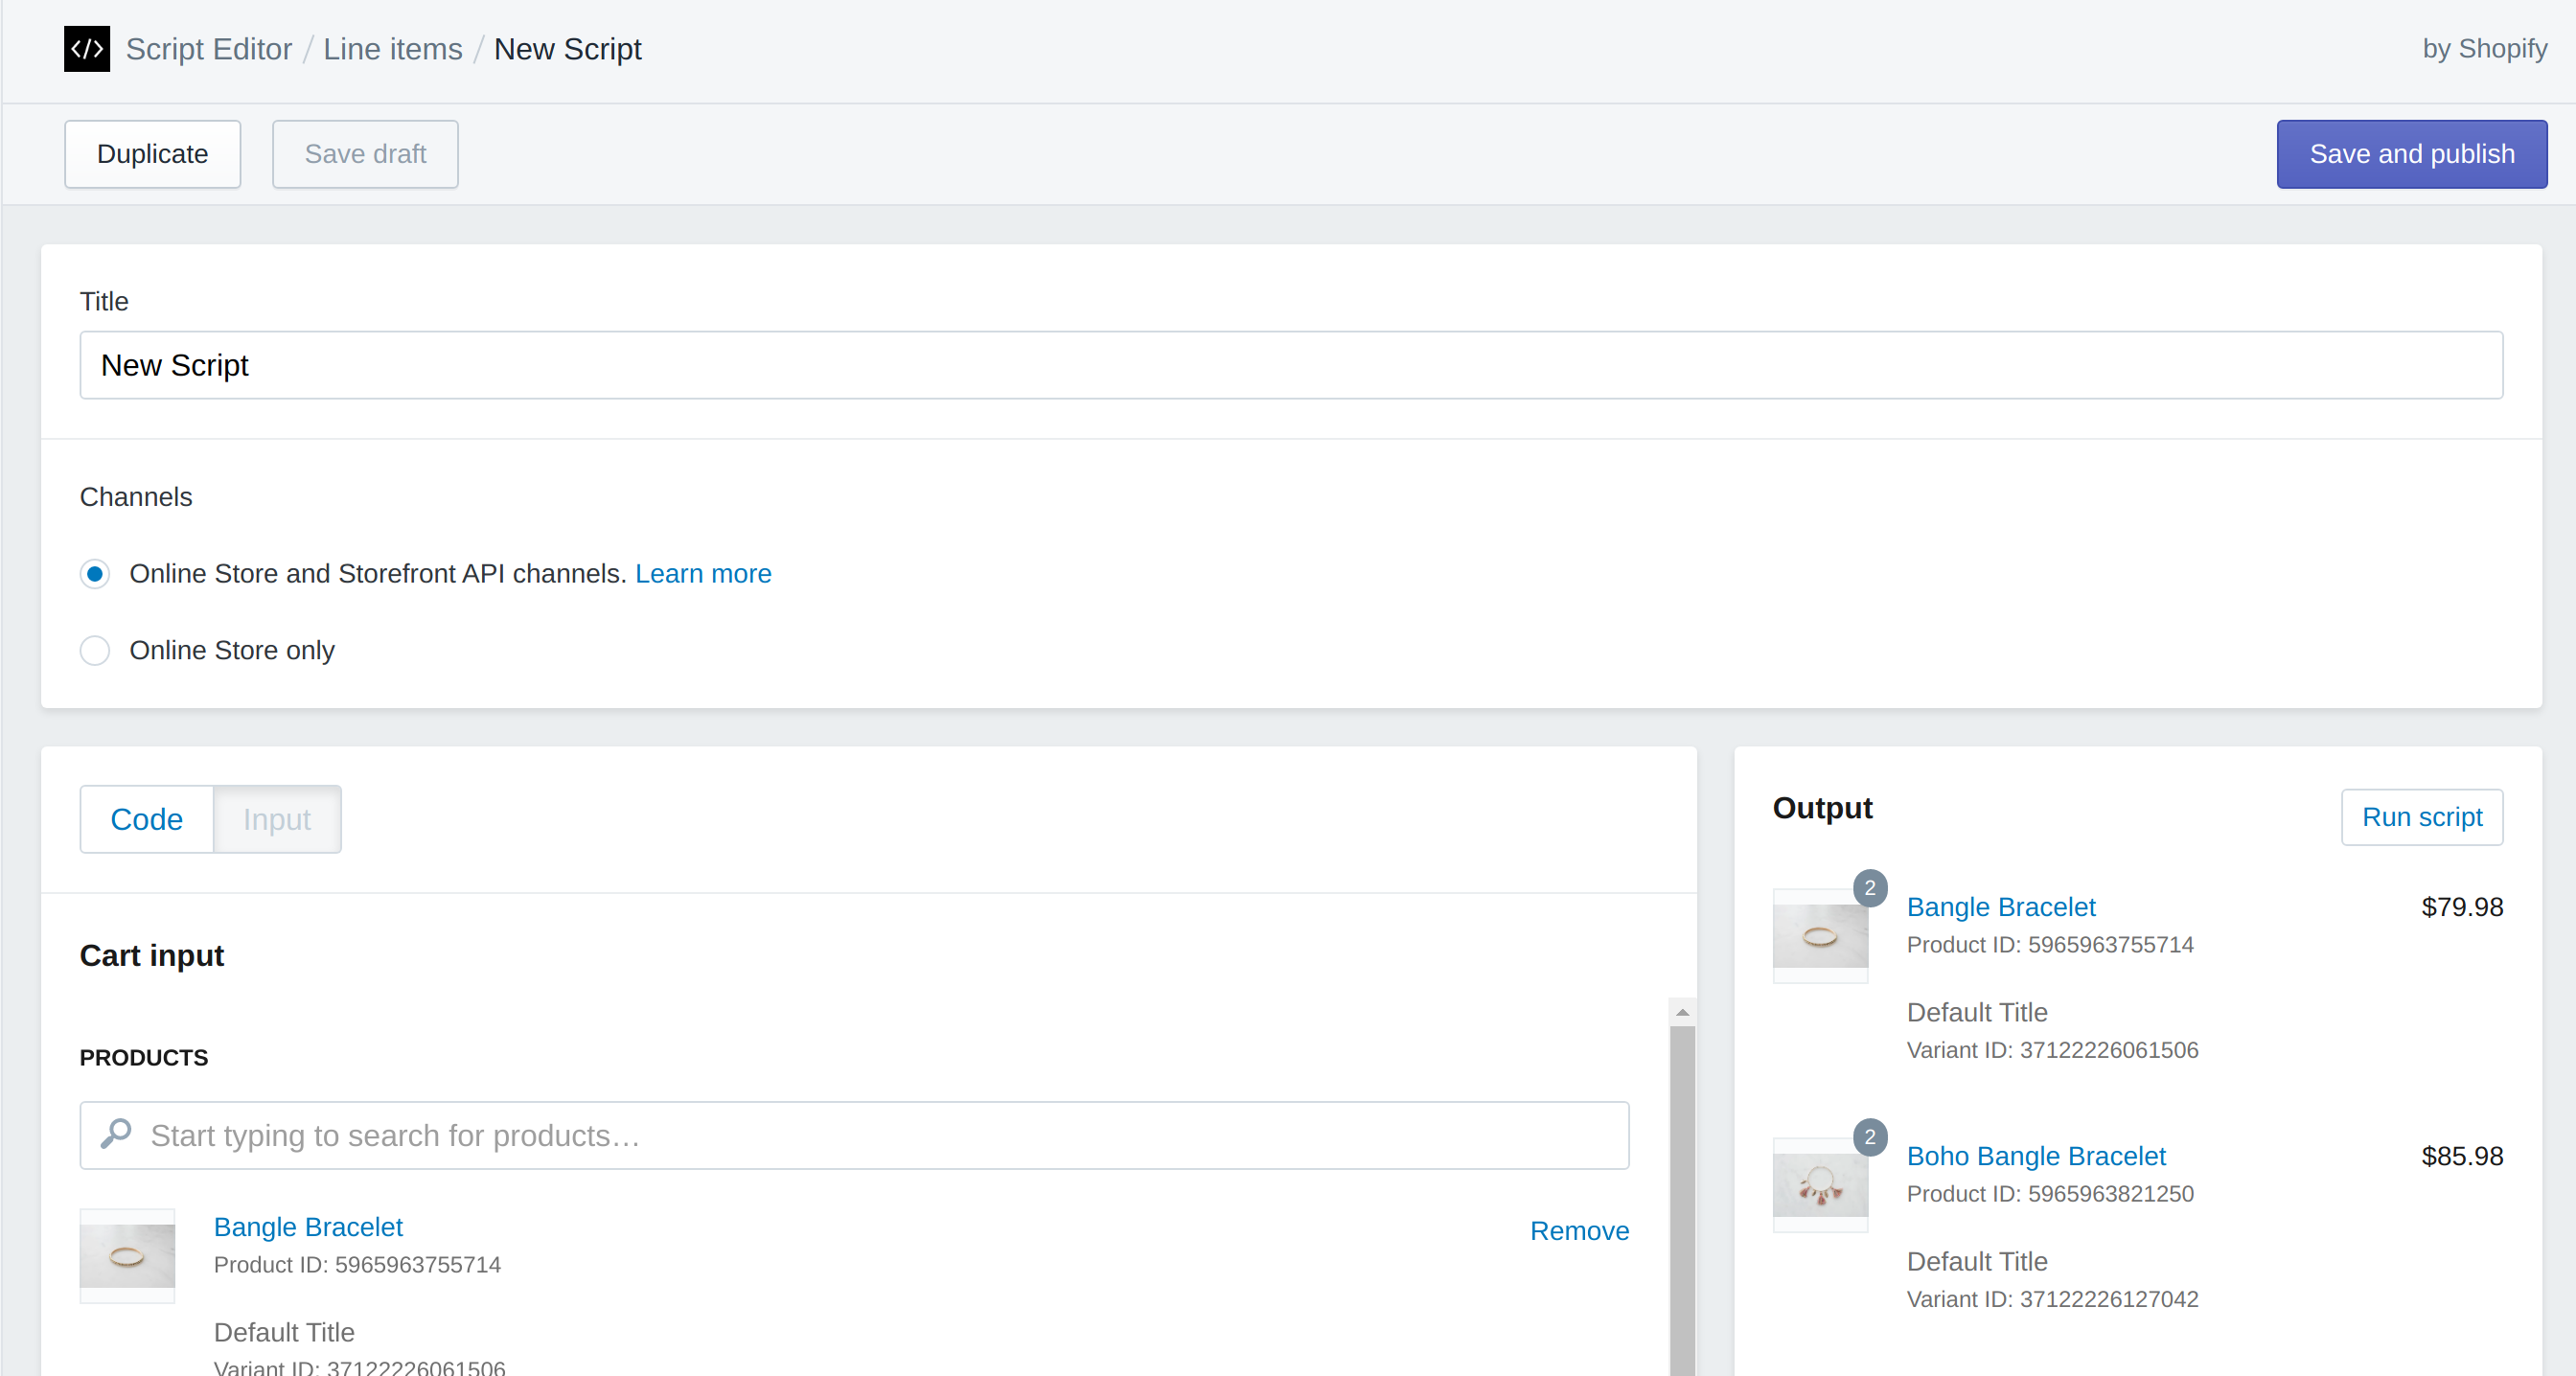
You’ll notice the Channels option — for our example case, this won’t really matter as we will only be using the online store. However, in your store you may need to evaluate the differences. Shopify creates a basic cart for you, with a couple of items which is handy.
The code
Here is the actual content of our script that will go into the code box, when you switch from the input tab.
WHOLESALE_TAG = 'WHOLESALE_'

discount_amount = 0
if Input.cart.customer
  Input.cart.customer.tags.each do |tag|
    if tag.start_with?(WHOLESALE_TAG)
      discount_amount = tag.split(WHOLESALE_TAG)[1].to_i
      break
    end
  end

  if (discount_amount > 0)
    Input.cart.line_items.each do |line_item|
      line_item.change_line_price(line_item.line_price * ((100 - discount_amount) / 100), message: "Wholesale discount (#{discount_amount}%)")
    end
  end
end

Output.cart = Input.cart
Not too bad! What is it actually doing? We have 2 global objects Input and Output, these are our entry points into everything else. On lines 4-10, we are iterating over the customer’s assigned tags (if there is a customer). If we find a matching one that starts with WHOLESALE_, we stash the number following that in discount_amount. Then, if this was successful (discount_amount > 0), we iterate over all the cart items and apply the discount.
To test this script, you can click the “Run script” button in the output panel along the right. Wait.. nothing happened. This is actually a good sign — we haven’t set a customer on the input screen, so there should be no discount. If you are planning to implement prices across your site as a part of this tutorial, I would recommend setting up a user from your storefront so that you can log in and test. If you aren’t interested in that portion, you can create one from the admin panel. Either way, you will need to go into the admin Customers panel and add a tag to a customer such as WHOLESALE_10. Then, return to the script editor screen, open our script, and set the customer to the one you just added the tag to.
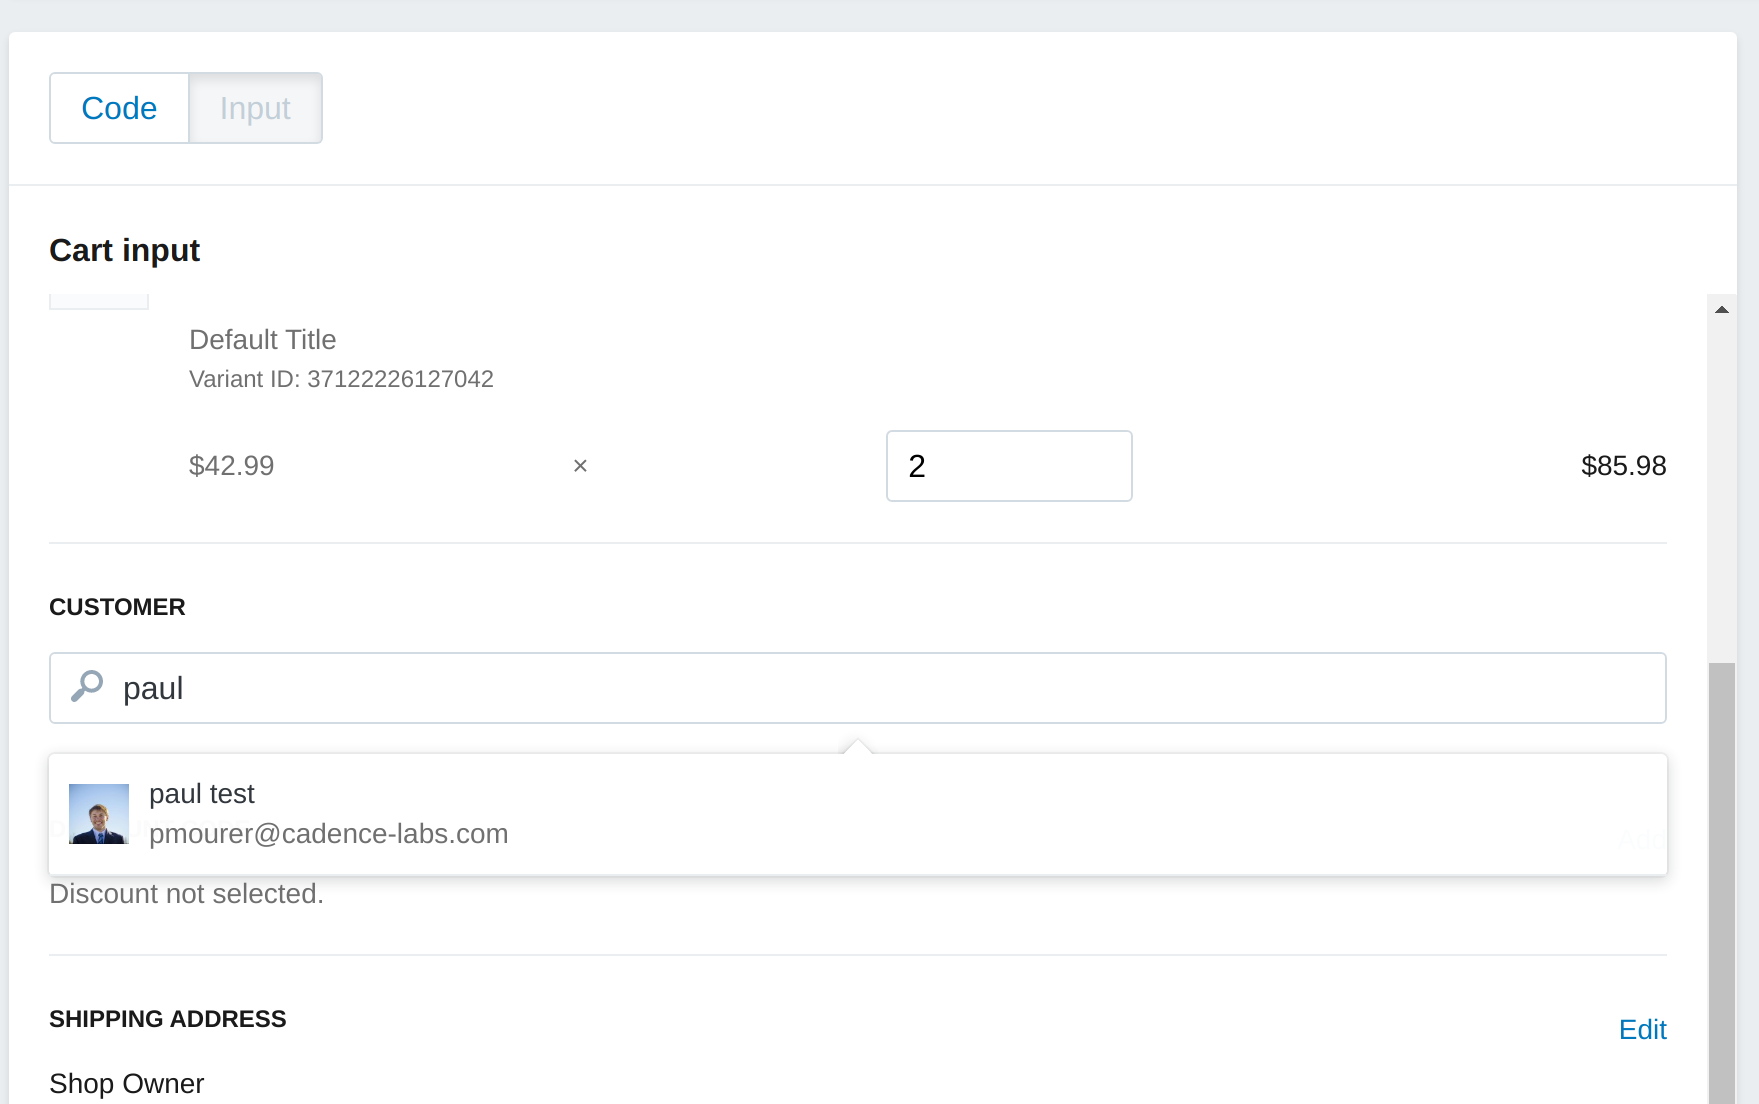
Once the customer is set on the cart, run the script again. You should see the output tab look something like this:
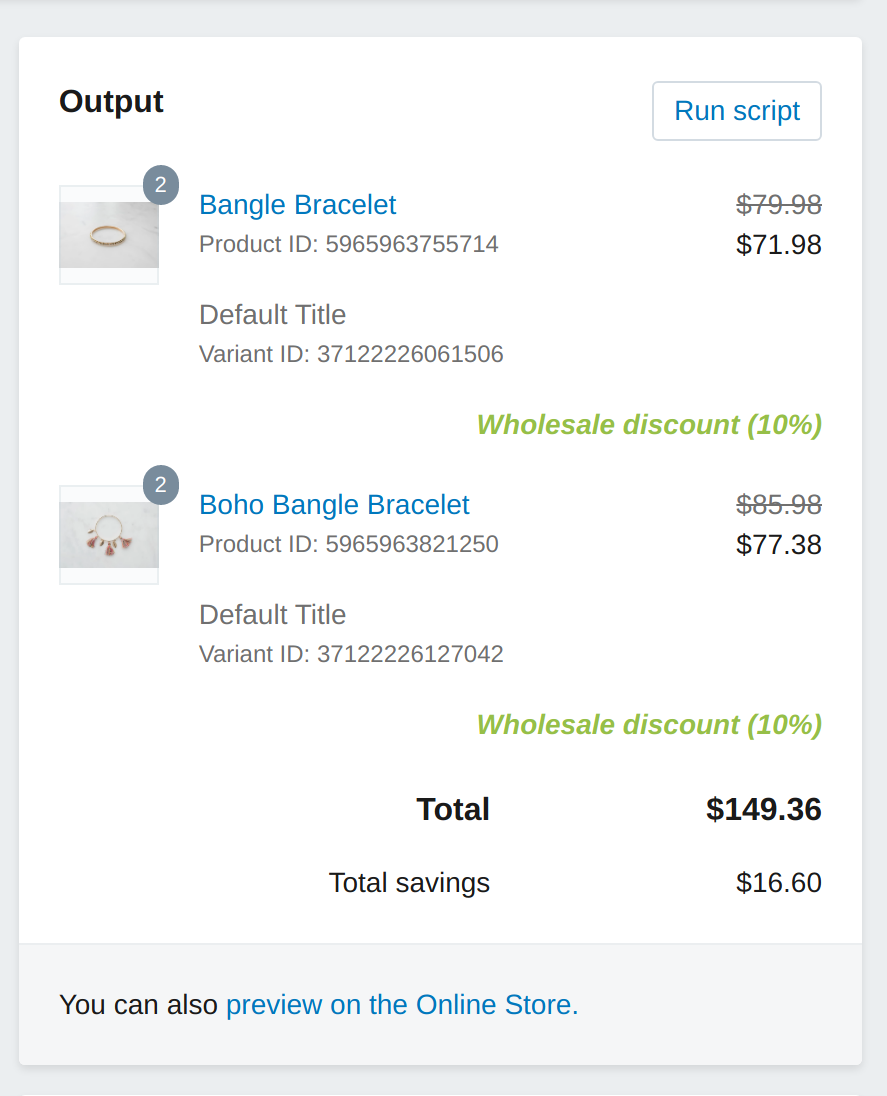
I tagged my test customer with WHOLESALE_10 and so they received a discount of 10% across the board. You’ll also notice there is a preview link, this will let you peruse your storefront as normal with the script enabled! Let’s try it out. I added a few items to my cart (once logged in) and here’s what it looks like:
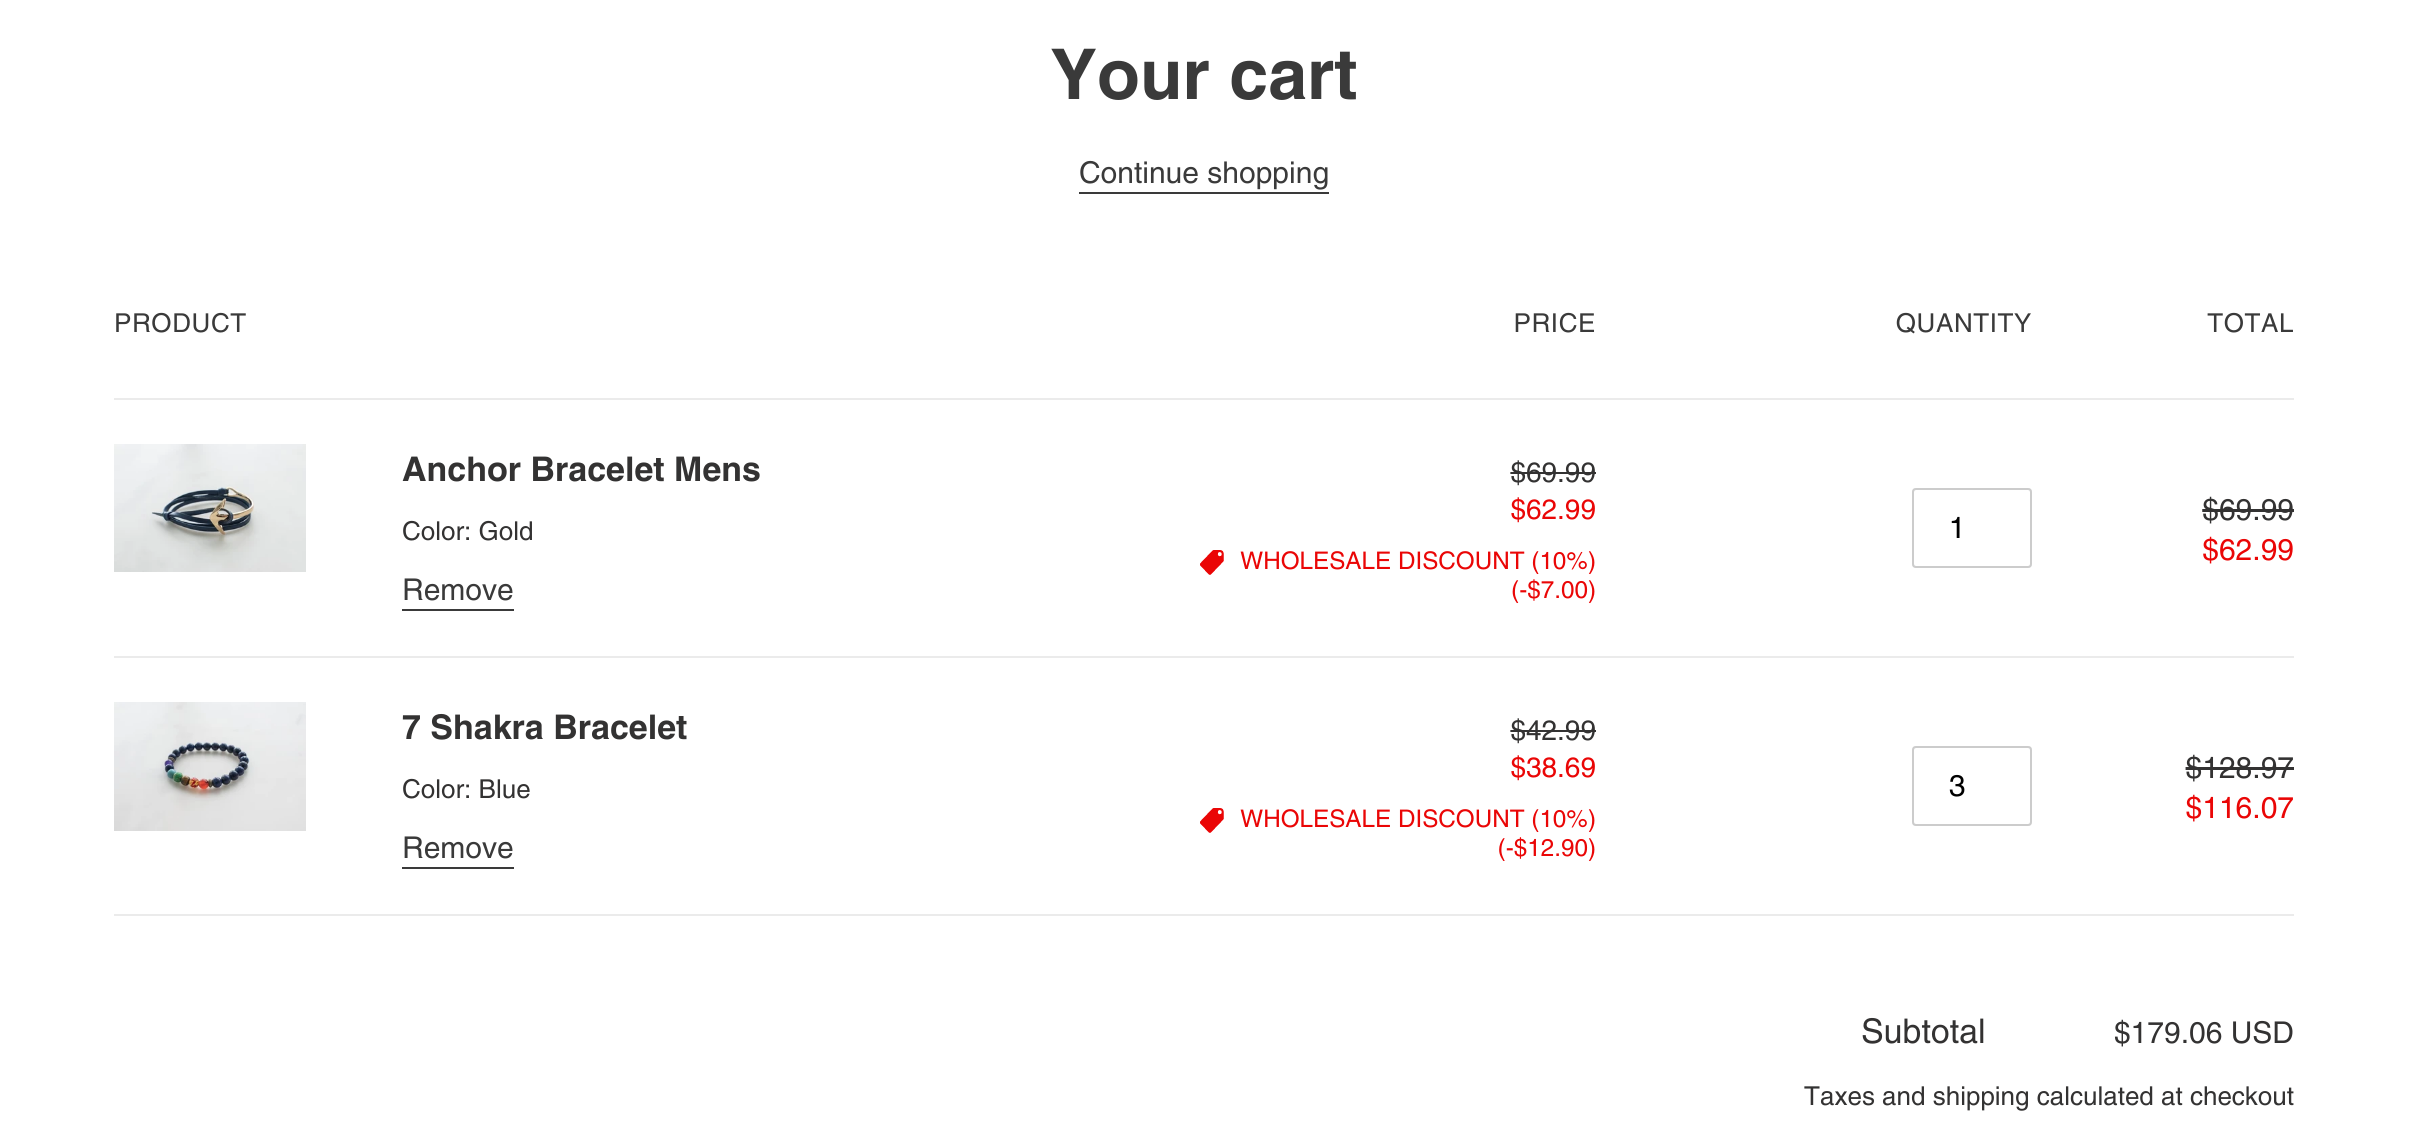
You can see the 10% discounts applied. However, if you visit a product detail page or collection page, you’ll see the normal prices. Why is that? Well, as stated earlier, this script only applies to the cart. It does not affect our catalog in any way. Perhaps this is fine for your use case and if so, congrats! You are done!
I think this creates a confusing experience, and it would be better if the product pages also showed the final prices of the items. In the next section we will be updating the theme to show the correct prices.
Theme pricing
We will be working with the debut theme, however this is likely a somewhat similar process for almost any theme. I’ve identified 3 places we will need to change the logic around pricing — 2 are in liquid and affect page load, the third is in the theme’s javascript and affects when changing variants on the product detail page.
Liquid pricing logic
I’m going to create snippet called discount-factor that will return the percentage of the total price that the customer should pay, as an integer. To better explain, if a customer is tagged with WHOLESALE_10, this snippet will return 90. This may seem slightly odd, but bear with me. Unfortunately, Shopify doesn’t allow floats in liquid so we couldn’t return 0.90. Additionally, this creates simpler math given the constraints within liquid and it’s use of filters for math.
Here is snippets/discount-factor.liquid
{%- comment -%}
  Pricing for wholesale customers
{%- endcomment -%}
{%- liquid
  assign discount_amount = 0
  assign price_percentage = 1
  assign wholesale_tag = 'WHOLESALE_'
  if customer
    for tag in customer.tags
      assign check = tag | split: wholesale_tag
      if check[0] == blank
        assign discount_amount = check[1] | plus: 0
        break
      endif
    endfor
  endif
  assign discount_factor = 100 | minus: discount_amount
  -%}
{{- discount_factor -}}
In the debut theme, I identified 2 locations that need to be updated — snippets/product-price.liquid (product detail page) and snippets/product-price-listing.liquid (product listings & tiles). The changes are similar in either theme. At line 12 in both files, you’ll see the following liquid, which is calculating the prices to be used in the rest of this snippet:
{%- liquid
  if variant.title
    assign compare_at_price = variant.compare_at_price
    assign price = variant.price
    assign available = variant.available
  else
    assign compare_at_price = 1999
    assign price = 1999
    assign available = true
  endif

  assign money_price = price | money
-%}
We need to obtain our discount_factor and then apply it to the price variable. I chose to do it to both sides of this if/else statement. The else block (I believe) is just for the sample tiles that display on the debut homepage.
Here’s the finished code, after pulling in our discount factor and applying the discount to the prices:
{% capture discount_factor %}{%- include 'discount-factor' -%}{% endcapture %}

{%- liquid
  if variant.title
    assign compare_at_price = variant.compare_at_price
    assign price = variant.price | times: discount_factor | divided_by: 100
    assign available = variant.available
  else
    assign compare_at_price = 1999
    assign price = 1999 | times: discount_factor | divided_by: 100
    assign available = true
  endif

  assign money_price = price | money
-%}
Hopefully now it’s a bit more obvious why we use the amount intended to be paid vs the discount percent for our discount_factor – this allows us to leverage order of operations to perform the following: price * 0.90 (isn’t math in liquid fun?).
Once this is sync’d up to your theme, you should be able to visit the collection page, product detail page, and cart page and see the appropriate price.
Javascript pricing logic
If you are on the product detail page on the debut theme, you’ll notice the discount isn’t applied to any variants that you switch to on a multi-variant product. In order to correct this, we are going to modify the JS to also account for our customer’s wholesale discount.
First, I’ll create a template that will expose the discount_factor to our themes JS on the global window object.
I’ve called this discount-factor-js.liquid and it is in the snippets folder. Here is the contents:
{% capture discount_factor %}{%- include 'discount-factor' -%}{% endcapture %}
<script>
    window.discountFactor = {{ discount_factor }}
</script>
All this did is make the discount factor (such as 90) available to our javascript whenever this snippet is loaded. Once that is created, we need to include it in our theme.liquid to make it available everywhere. I added the following on line 165 of my theme.liquid, inside the head tag.
{%- include 'discount-factor-js' -%}Once that is all set up, we need to utilize this in our JS. There’s a few places in the debut theme that we need to update, essentially we are looking for the JS that updates the price on the product detail page.. in debut this function is called _updatePrice and appears around line 8913 in assets/theme.js. As there’s a few places to update, it’s probably easiest to look at a diff to see what needs to be done. In short, anywhere that there is a price that will be displayed, we modify the price with our discount_factor. Return to the product detail page (and ensure you are previewing your script or have it enabled) and you will see the prices now line up when you change variants as well!
What’s next?
Here we learned a pretty basic example of how a Shopify Script can be used to modify cart line item prices. Shopify includes a number of examples in the Script Editor, which can also be explored here. At Cadence Labs, we have also seen this used to manage bundle products and free gift items as a couple more use cases. What have you found the Shopify Script Editor to be useful for?
Need help with Shopify?
We’ve had a lot of experience building websites in Shopify. If you need help, head over to the Cadence Labs contact page, or email us at [email protected].