
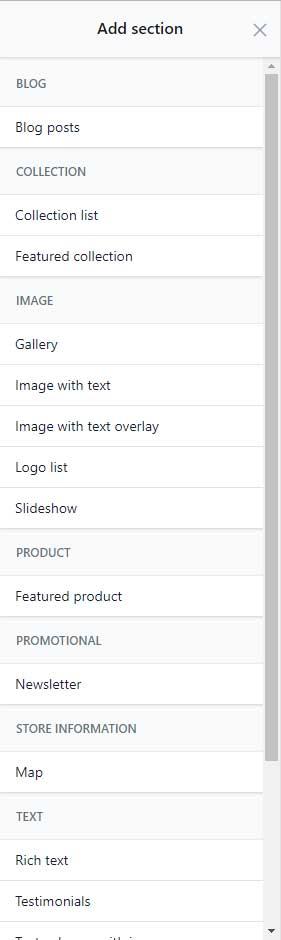
When customizing a theme in the admin section of your Shopify store you have probably seen something similar to this when editing the homepage: the ability to add, remove, and re-arrange different sections. This is extremely useful when trying to distinguish your site from other sites that may be using the same theme, as it gives you more control over the flow of your site instead of being forced into a certain order for the sections. Unfortunately, the options here are only available on the homepage. The Debut Theme was used as an example for the images in this blog, but you will find this is the case with most themes unless heavily customized.
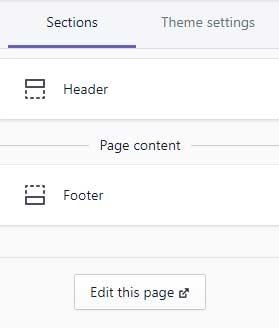
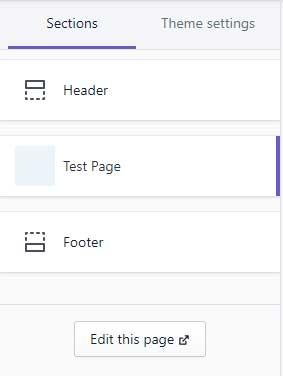
You will see something like this when trying to customize the contents of another page that isn’t the homepage:
Add New Page Template
First thing you will want to do is ‘Add a new template’ for the page you want to add dynamic sections to. For this example, our new page template will be named page.test-page.liquid. At the very minimum, the only thing you need in your new page template is the following code calling your new section you will create soon:
{% section ‘test-page’ %}
Optionally, this can be wrapped in any html elements you want or need for styling purposes, but that is up to you, the only thing that is mandatory is the code above.
Apply Template to Page
After you have created this template you will be able to select it when editing a page through the admin section of your Shopify store. You will see a ‘Theme templates’ section in the sidebar of the page that looks like this:

Select the new template you created, in this example it is ‘page.test-page’ and make sure to Save the page.
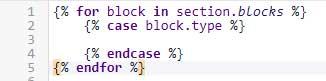
Add New Section
Now you will want to ‘Add a new section’ to correspond with the section code we added to the page template earlier. For this example, our new section will be named test-page.liquid. The beginning of our section must look something like this:
{% for block in section.blocks %}
{% case block.type %}
    {% endcase %}
{% endfor %}
{% case block.type %}
{% endcase %}
{% endfor %}
The space in between the case statements and below the endfor statement is there on purpose because that is where we will add the dynamic sections we want to be able to control through the Shopify admin on our ‘Test Page’. For this example, we will be adding ‘Full Width YouTube Video’:
{% for block in section.blocks %}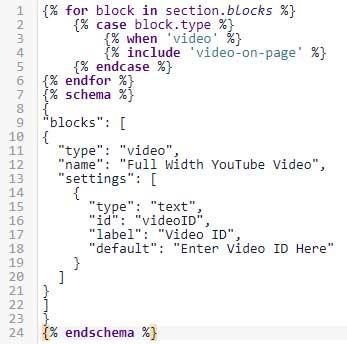 {% case block.type %}
{% when 'video' %}
{% include 'video-on-page' %}
{% endcase %}
{% endfor %}
{% schema %}
{
"blocks": [
{
"type": "video",
"name": "Full Width YouTube Video",
"settings": [
{
"type": "text",
"id": "videoID",
"label": "Video ID",
"default": "Enter Video ID Here"
}
]
}
]
}
{% endschema %}
{% case block.type %}
{% when 'video' %}
{% include 'video-on-page' %}
{% endcase %}
{% endfor %}
{% schema %}
{
"blocks": [
{
"type": "video",
"name": "Full Width YouTube Video",
"settings": [
{
"type": "text",
"id": "videoID",
"label": "Video ID",
"default": "Enter Video ID Here"
}
]
}
]
}
{% endschema %}
This will allow you to select the ‘Full Width YouTube Video’ dynamic section on the ‘Test Page’ when customizing it and will give you a text box to enter a videoID (as defined in the `schema` section of the code above, see https://help.shopify.com/en/themes/development/theme-editor/settings-schema and https://help.shopify.com/en/themes/development/sections for more details on setting types and useable syntax in the section file), however not yet because we have not defined the snippet that will use the settings from the ‘schema’ part yet.
You can add multiple different dynamic sections here by including more ‘when-include’ statements as a pair, as well as adding another `block` to the `schema` part at the bottom, for example:
{% for block in section.blocks %}
    {% case block.type %}
        {% when 'rich-text' %}
        {% include 'rich-text-on-page' %}
        {% when 'video' %}
        {% include 'video-on-page' %}
    {% endcase %}
{% endfor %}
{% schema %}
{
"blocks": [
{
  "type": "rich-text",
  "name": "Rich text",
  "settings": [ *SETTINGS FOR RICH TEXT SECTION* ]
},
{
  "type": "video",
  "name": "Full Width YouTube Video",
  "settings": [
    {
      "type": "text",
      "id": "videoID",
      "label": "Video ID",
      "default": "Enter Video ID Here"
    }
  ]
}
]
}
{% endschema %}
This will give you two choices of dynamic sections when customizing the ‘Test Page’: ‘Full Width YouTube Video’ and ‘Rich Text’, however we have not defined the snippet that will use the settings from the ‘schema’ part yet so now we need to define the snippets that will actually make use of the settings.
Add New Snippet
Here you will want to ‘Add a new snippet’ (same as adding new section or template, except there will be a `Snippets` directory) to correspond with the snippet(s) next to the include statement(s) above. For this example, our new snippet will be named video-on-page.liquid. For simplicity, the code in this snippet is using the video ID that is coming from the Customize theme settings and adding it to a YouTube embed code. You can define any re-usable dynamic section you want here, even copy the ones that are used on the homepage.
The important thing to note here if you copy the sections that are used on the homepage, you want to change out the keyword `section` for `block` so that it is used like in the snippet below:
<div class="videoWrapper">
    <iframe src="https://www.youtube.com/embed/{{ block.settings.videoID }}?rel=0&hd=1" frameborder="0" allowfullscreen></iframe>
</div>
Another thing to note if copying a pre-existing section from the homepage is that the `schema` part does not go into the snippet, it needs to be copied into the `section` file you created, in this example it is in the `test-page` section, bottom of the file.
Each ‘include’ statement from above (between the ‘case’ and ‘endcase’) will need its’ own snippet, and make sure to use {{ block.settings.<ID OF SETTING> }} when using the setting from the `schema` part at the bottom.
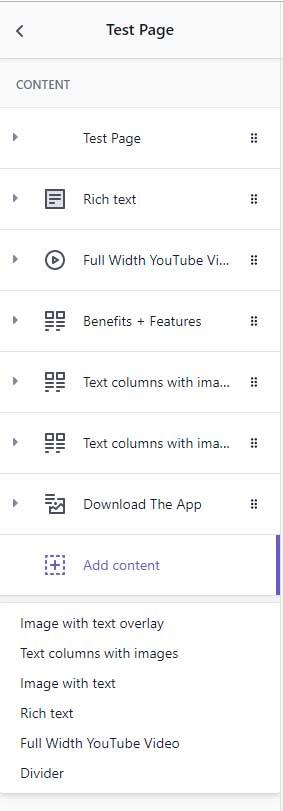
And there you have it! Now when you are customizing your Shopify theme and you are on the Test Page you will see something like this:
Click on the ‘Test Page’ section and the next thing you will see is any currently existing dynamic sections you have on this page. Now you will be able to add, remove, and re-arrange the dynamic sections that you added to the ‘test-page’ section file.
Need help with your Shopify site?
We’ve had a lot of experience building Shopify websites. If you need help, head over to the Cadence Labs contact page, or email us at [email protected]. We offer affordable rates for our Shopify development services.